
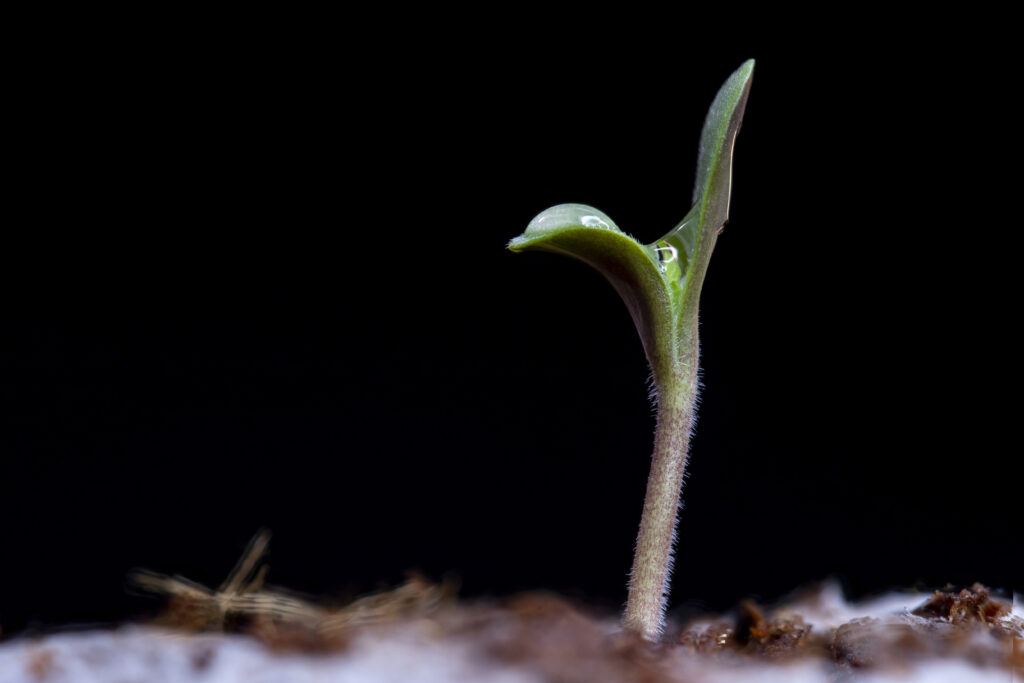
Germinating seeds is one of those things where it can be challenging to diagnose the problem when something goes wrong. For instance, seeds that don’t pop at all could be caused by genetic viability, temperature issues, or even pathogens. In turn, there are some useful guidelines around seed germination, many of which are common knowledge and others that may be a little less well-known.
In this article, we will run you through some of the techniques we’ve found to be successful when germinating cannabis seeds and some of the reasons for these approaches. Let it be known, however, that germination methods change between individuals and what one person deems a standard practice. Others may find it unconventional or even anxiety-inducing. While there most certainly are right ways and wrong ways to germinate seeds – remember to stick with what gives you the best results. Don’t change your germination methods if you’ve not encountered issues with your current practices.
But Firstly – The Reasons for Dud Beans
In order to talk about dud seeds, we first need to establish what dud means. Is it a dud if it doesn’t sink in water? Is it a dud if it sinks but doesn’t crack? What exactly are we defining as a dud seed?
Having worked in the genetics industry for a while now, it is astounding how many customers encounter germination issues and immediately want to blame the quality of the seed. This is understandable to a degree because we often forget that not everyone who grows cannabis does it to a degree of obsession. Many casual growers don’t bother to look into how the plant works, and in turn, they don’t understand that cannabis seeds are subject to a number of variables.
For many of these growers, a dud seed is one that doesn’t reach the vegetative state. This is usually not the case, and when conducting our own germination tests on the same batch of seeds, we see success where they saw failure.
I would define a dud seed as one where the viability of the seed has dropped to a point where the seed would fail to germinate, even under ‘good conditions.’ After all, seeds are not switches – it’s not just viable one second and then not viable the next (though it does sometimes feel that way with seeds that have been improperly stored). Unfortunately, the challenge here is knowing whether or not the seed you tried to germinate was truly a dud or if the non-germination resulted from human error.
What To Do If You Suspect a Dud Pack
If you’ve noticed that a pack of seeds you tried to germinate didn’t pop, you should consider taking the following steps.
Message The Seedbank
First, drop a friendly message to the seed bank where you bought your seeds. Enquire whether or not there are any known issues with that particular batch of seeds or strain. In some cases, seed banks will remove stock that is reported as problematic by customers. In these cases, there is sometimes a chance for you to get replacements or refunds. So take this as your first course of action.
Message The Breeder
If the seed bank isn’t unaware of any issue, consider contacting the breeder. Sometimes there are bad batches of seeds, and the breeders are aware of this, while the seed banks stocking them may not be. Again, be polite and ask them whether or not there are any known issues with that seed drop.
Examine The Germination Method You Used
If both the seed bank and the breeder have no reported issues, before you consider it a dud seed – ask yourself what could have gone wrong in your germination process to cause it. I’ve been guilty in the past of also just assuming the problem lies with the beans, but when being honest with myself, I was able to find all types of shortcuts in my methodology that could have negatively affected my germination rates.
Think about whether you could have introduced any pathogens (did you see any signs of mold on the seeds when they were in the paper towels?). Were your temperatures on point? Was your humidity correct? What is the moisture of your medium?
Only after running through these steps should you consider genetic viability issues to be the problem. Again, while it happens – there’s usually more at play than just bad beans. With that said, older stock from seedbanks will carry a lower probability of germination.
How To Store Your Cannabis Seeds
Storing your seeds can be a challenge, especially in South Africa. The long and short of it is that you want your seeds to be kept at cold temperatures in low humidity. This is where you’ll get the longest storage time. For many international growers, the solution is a fridge with a sealed box, along with dehumidifying mechanisms. Most commonly used is rice. Dry rice will absorb humidity and if you place your seeds packs inside zip locks, and add those zip locks into a sealed box – along with rice.
Unfortunately, load shedding makes this process a bit more risky. Because if there’s anything that causes viability issues with seeds, it’s rapid swings in the environment. If you’re able to get your fridge on a backup power system, that would be ideal – but otherwise, opt for a dark, cold cupboard – still using the same method of container storage. Also, keep your seeds out of light.
Most seeds that are stored in a dark, cold cupboard can last around 2-3 years before you may see viability become an issue. This can of course extend further, and I have had seeds that are five years old pop in this storage method, but it becomes more risky. A low-humidity fridge environment can retain viability for 3 to 5 times longer.
The Germination Process
While there are, as mentioned, factors that influence your germination rates outside of the germination process itself, the majority of problems do pop up here. This is where there are the most amount of variables and also where it becomes the most challenging to identify the issue. Because we can’t always see or tell what we’ve done wrong, we may assume a viability problem, but no matter how experienced you are at growing cannabis, there’s always the chance something can go wrong – which is why it should be our goal in the germination process to reduce these risks.
Here are some common causes for non-germination:
- Temperature problems (either too hot or too cold)
- Overwatering and underwatering
- Pathogens
- Too much light
- Pests
- Humidity control
- Overfeeding
- Underfeeding
Temperatures that are too low will cause slower growth and, when combined with high humidity, can lead to mold formation. Additionally, temperatures that are too high can cause the seeds to die quickly from the heat. If you’re using a heat mat, consider layering cardboard underneath or a towel so you can remove some of the excess heat. Some heat pads have a controller that lets you set the desired temperature, but if using a non-thermostat-controlled mat, consider layering cardboard between it and your seeds. You want to keep temperatures in the lower 20s (Celcius). Similarly, if your environment is too cold (<15’C), you may benefit from using a heating pad.
Overwatering your seeds, whether in their paper towels (if using that method) or in a soil/soiless medium can cause a lot of problems. This is especially true for very young plants which can easily suffer from ‘dampening off’ – this results in your plant typically falling over, with a weak, narrow stem base. Underwatering can be just as bad – and one should strive to provide the plants with a steady source of moisture without much dry back in the early stages but limit the amount of water given.
Pathogens aren’t something that is considered by many growers, but in the same way, if you leave a wet towel in a closed area, it can form mold – the paper towels you use during germination can also mold if they are too wet and cause problems. Additionally, there are other sources of pathogens in the germination process, even from water canisters that may not bug large, established plants – but can have an impact on smaller, younger growth.
Too much light during the early stages of light can be a problem for cannabis seedlings. You want to provide sufficient light for them to grow, but you don’t want to fry them. If your lights are higher intensity, place them further away during the first few weeks of their lives.
Pests of all kinds can affect your germination success. Rats are known to chew the tops off seedlings regularly – and there is of course always the risk of your traditional insect pests.
Humidity control is the most important in the first 48 hours of planting a seed. In most cases, just being in a medium that is moist will provide enough humidity, and you still want to aim for a higher humidity for a faster growth rate, but even in lower 50-60% humidity, most seedlings will sprout without too much concern. You may encounter issues during very low humidity. More concerning is the humidity that is too high and promotes a stale environment which can also promote mold growth.
Overfeeding is something that everyone can suffer from. Whether you’re growing in hydro or soil, some soil mixes are simply too hot to germinate cannabis in and can quickly result in symptoms and even seedling death. And salt feeds given in high doses can quickly damage plants too. Be careful about store-bought potting soils, which are often far too rich for cannabis.
Underfeeding can be a problem in soilless mediums where the plant has no nutrients to utilize unless they are fed to them with a nutrient mix. Ensure to start your seedlings on a safe dosage and work up as they grow.
Here is our method for popping beans, which we have good success with. But again, you should use the method you’re most comfortable with:
- Soak the seeds in pH-balanced water for 8-16 hours.
- Take a few slabs of tissue paper and fold them over three or four times. Then get them moist. The ideal amount of moisture is where the paper towel is very moist but not very wet. Water shouldn’t be seeping off it. If this happens, you can drown your seeds early on in the germination process.
- Place the seeds in the towel, folding one end over the seeds. Then place them in a humid area. I typically use larger ziplock bags which I semi-close, allowing just enough air to enter where it’s not stale but retains humidity.
- Keep the paper towel moist and in a dark area, and in the range of 18-24 degrees Celsius. After about 24-72 hours, your seeds will have rooted and can easily be planted into your medium of choice. I initially plant into Jiffy pellets, but you can use any medium as long as it’s suitable for seedlings.
As you can see, there’s more to seed viability than just ‘dud’ seeds. And while no one likes to take the fault, we as growers need to acknowledge that no matter how confident we are in our methods, there are always chances of mistakes, and methods that worked for some seeds won’t work for every seed. In the end, it just comes down to how strong that seed is. Sensitive seeds will be more prone to problems from smaller misteps in the germination process.
Popular Products
-
 Vibes Rolling Papers- Hemp- King Size Slim
R36.00
R21.60 -
 The Rasta Rig (23cm)
R1,999.00
R1,199.40 -
 Vibes Rolling Papers - Ultra Thin- King Size Slim
Price range: R36.00 through R1,750.00
Price range: R21.60 through R1,050.00
Leave a Reply